
Sneaky Packets Part 1 - Basic Proxy/Tunnel
Introduction
The repo associated with this project can be found here.
Don’t you hate it when pesky firewall rules or network configurations prevent you from reaching your favorite, definitely non-malicious, domains? Someone recently told me that their workplace even blocks connections on port 1337! We can’t have that. Let’s dive into some things we can do to alleviate common networking challenges faced by red teams, as well as inform blue teamers of typical shenanigans used to circumvent various network protections.
Now you might be wondering why we would want to build our own proxy and/or tunneling capability when there’s lots of great open source tools already available. We could use NGINX to proxy our traffic, or SSH to create any basic TCP tunnels we might need.

Well those solutions are boring, and we’re not skids so we want to understand how this kind of stuff works under the hood. Knowing how to implement these types of features also allows you to add them into all sorts of useful tools. In addition, having unique tools can often reduce the chances of your methodologies/tools already being signaturized. It’s also import to understand how adversaries might be using them in their capabilities.
This tutorial will walk you through how to implement your own simple proxy and tunnelling capability. I’ve also put together a docker-based environment involving multiple containers to show you some typical use cases.
I’d also like to point out that a tunnel also usually involves encapsulating data into a pre-existing protocol (http/s, icmp, dns, your own custom protocol, etc.). We’re not going to implement that piece here, but will likely do it in a follow on post. This post focuses on taking in a connection and getting it to a destination, while also bypassing potential blocks along the way.
Proxying Summary
To build towards the concept of tunneling, we’ll start by implementing a simple proxy. Proxies are fairly simple and most people are familiar with them, making them a great starting point. The proxy I’ll be demonstrating in this tutorial is purposefully as simple as possible. For that reason it is not at all ready for any sort of deployment (don’t use it). This also goes for the tunneling code shown later. Perhaps as we build on these techniques in future tutorials, we’ll approach something remotely deployable.
The concept of a proxy is straight forward enough. A proxy simply acts as a forwarding agent for any of your network traffic. In this case we’ll be focusing on TCP based communications, but similar methodologies would allow this to also be expanded to UDP. In our example, we’ll create a bare bones TCP traffic forwarder that will listen for connections on a specified port, and forward the received traffic to a specified destination.

Main
Our main function will set up a local listener to receive any traffic that is to be forwarded. Upon receiving a connection, it will establish another connection to the specified final destination. At this point it will loop, transfering data back and forth from the original source to the final destination and vice versa. The proxy sits in the middle of these interactions, ensuring packets get where they are supposed to go, and somewhat masking the identity of the original source.
Here’s the main function for our proxy, which we will break down momentarily:
int main()
{
    int status = 0;
    int listen_sock = 0;  // Receives proxy requests
    int remote_sock = 0;  // Proxy target
    int client_sock = 0;  // Client to proxy
    struct sockaddr_in client_addr = {0};

    status = setup_local_listener(&listen_sock);
    if (status < 0)
    {
        puts("main: Failed to setup local listener.");
        return 1;
    }

    client_sock = accept(listen_sock, (struct sockaddr *)&client_addr, &(int){0});
    if (client_sock == -1)
    {
        if (errno != EAGAIN){
            perror("main accept");
            return errno;
        }
    } else
    {
        puts("accepted");
        status = fcntl(client_sock, F_SETFL, fcntl(client_sock, F_GETFL, 0) | O_NONBLOCK);
        if (status == -1)
        {
            perror("main client_sock fnctl");
            return status;
        }
    }

    status = setup_remote_sock(&remote_sock);
    if (status != 0)
    {
        puts("main: Failed to setup remote socket.");
        return 1;
    }

    while(1){
        status = data_checks(client_sock, remote_sock);
        if (status < 0 && errno != EAGAIN)
        {
            puts("main: Failed data checks.");
            return 1;
        }else if (status == 0){
            puts("connection closed");
            close(client_sock);
            close(remote_sock);
            client_sock = 0;
            remote_sock = 0;
        }
    }

    return 0;
}
The code above starts by setting up the local listener, which awaits connections from the original source we wish to proxy. Once the socket is properly set up, it’s file descriptor will be stored in the listen_sock variable.
    status = setup_local_listener(&listen_sock);
    if (status < 0)
    {
        puts("main: Failed to setup local listener.");
        return 1;
    }
Listen
Let’s take a look at how we’re accomplishing this:
/**
 * @brief Sets up the local listener socket
 *
 * @param listen_sock pointer to socket fd to setup
 * @return int error code
 */
int setup_local_listener(int *listen_sock)
{
    int status = 0;
    struct sockaddr_in listen_addr = {0};

    listen_addr.sin_family = AF_INET;
    status = inet_pton(AF_INET, LISTEN_ADDR, &(listen_addr.sin_addr));
    if (status != 1)
    {
        perror("setup_local_listener inet_pton");
        return -1;
    }
    listen_addr.sin_port = htons(LISTEN_PORT);

    //Create listening socket to receive proxy requests
    *listen_sock = socket(AF_INET, SOCK_STREAM, 0);
    if (*listen_sock == -1)
    {
        perror("setup_local_listener socket");
        return status;
    }
    status = setsockopt(*listen_sock, SOL_SOCKET, SO_REUSEADDR, &(int){1}, sizeof(int));
    if (status == -1)
    {
        perror("setup_local_listener setsockopt");
        return status;
    }
    status = bind(*listen_sock, (struct sockaddr *)&listen_addr, sizeof(listen_addr));
    if (status == -1)
    {
        perror("setup_local_listener bind");
        return status;
    }
    status = listen(*listen_sock, SOMAXCONN);
    if (status == -1)
    {
        perror("setup_local_listener listen");
        return status;
    }

    return status;
}
It might seem like a lot, but the vast majority of this is just error checking.
The first thing we’re doing to set up the local listener is filling in the listen_addr struct with appropriate values.
We’ll start by converting our listening address (LISTEN_ADDR) to a form the linux kernel expects (an integer) via the inet_pton syscall, which stands for “presentation to network”.
inet_pton(AF_INET, LISTEN_ADDR, &(listen_addr.sin_addr));
The port is already an integer, but it’s in little endian format, and needs to be converted to big endian. What this basically means is that the port number needs to be converted from something our local CPU understands, to a universal network standard. The htons (host to network short) system call will handle this for us.
listen_addr.sin_port = htons(LISTEN_PORT);
Now that our listen_addr struct is built, we can set up the socket itself. AF_INET refers to ipv4, and SOCK_STREAM informs the kernel we’ll be using TCP. As a side note, you can do some pretty neat stuff in regards to inter-process communication (IPC) using AF_UNIX sockets.
*listen_sock = socket(AF_INET, SOCK_STREAM, 0);
Next, we’ll allow our socket to be re-usable. This makes it so that our operating system won’t try to prevent us from listening on the port again if the process crashes. The &(int){1} value basically just allows us to ignore some of the output this function provides, as we don’t really care.
setsockopt(*listen_sock, SOL_SOCKET, SO_REUSEADDR, &(int){1}, sizeof(int));
Lastly, we’ll bind our socket to the information stored in *listen_addr, and begin listening for connections.
bind(*listen_sock, (struct sockaddr *)&listen_addr, sizeof(listen_addr));
listen(*listen_sock, SOMAXCONN);
We’re now ready to receive connections to proxy! Of course if we actually receive any connections at this point, we’ll just end up dropping them.

In order to actually receive a new connection we’ll need to accept it. We’ll then have a new socket associated with that connection.
client_sock = accept(listen_sock, (struct sockaddr *)&client_addr, &(int){0});
if (client_sock == -1)
{
    if (errno != EAGAIN){
        perror("main accept");
        return errno;
    }
} else
{
    puts("accepted");
    status = fcntl(client_sock, F_SETFL, fcntl(client_sock, F_GETFL, 0) | O_NONBLOCK); // Add non-blocking to existing settings
    if (status == -1)
    {
        perror("main client_sock fnctl");
        return status;
    }
}
You’ll see we’re also altering the settings associated with the socket via the fcntl system call. Don’t worry too much about how this works, just know that the O_NONBLOCK flag makes the socket “non-blocking”. This allows the program to keep moving even when we aren’t receving new data on this socket. You’ll see why this matters soon enough.
Remote Connection
Now we have our client connected, we’ll want to connect them to their destination.
status = setup_remote_sock(&remote_sock);
The process for this is very similar to how we set up the local connection, except simpler. We don’t need to bind anything or listen for connections, we simply establish a connection to the configured remote address. Once again, the resulting socket will be made non-blocking.
/**
 * @brief Set up the remote socket
 *
 * @param remote_sock target socket to proxy traffic to
 * @return int error code
 */
int setup_remote_sock(int *remote_sock)
{
    int status = 0;
    struct sockaddr_in remote_addr;

    *remote_sock = socket(AF_INET, SOCK_STREAM, 0);
    if (*remote_sock == -1)
    {
        perror("setup_remote_sock: socket");
        return -1;
    }

    remote_addr.sin_family = AF_INET;
    status = inet_pton(AF_INET, REMOTE_ADDR, &(remote_addr.sin_addr));
    if (status != 1)
    {
        perror("setup_remote_sock: inet_pton");
        return -1;
    }
    remote_addr.sin_port = htons(REMOTE_PORT);

    status = connect(*remote_sock, (struct sockaddr *)&remote_addr, sizeof(remote_addr));
    if (status == -1)
    {
        perror("setup_remote_sock: connect");
        return status;
    }
    status = fcntl(*remote_sock, F_SETFL, fcntl(*remote_sock, F_GETFL, 0) | O_NONBLOCK);
    if (status == -1)
    {
        perror("setup_local_listener fnctl");
        return status;
    }

    return status;
}
Data Exchange
Great! Our connections are set up and we’re ready to exchange data. To accomplish this we’ll loop continually, checking for new data from either side on each loop iteration. If there’s any new data, we’ll forward it to the appropriate destination.
while(1){
    status = data_checks(client_sock, remote_sock);
    if (status < 0 && errno != EAGAIN)
    {
        puts("main: Failed data checks.");
        return 1;
    }else if (status == 0){
        puts("connection closed");
        close(client_sock);
        close(remote_sock);
        client_sock = 0;
        remote_sock = 0;
    }
}
You’ll see when we check the status of our data_checks we’re also checking if the error number is EAGAIN. This is because we want to ignore this “error”, as it just means we didn’t receive any data on a non-blocking socket.
And here’s our data checks:
/**
 * @brief Checks for new data from client/server
 *
 * @param client_sock connected client socket
 * @param remote_sock socket connection to target host
 * @return int error code
 */
int data_checks(int client_sock, int remote_sock)
{
    int status = 0;

    char data[MAX_TCP] = {0};
    status = read(client_sock, data, sizeof(data)-1);
    if (strlen(data) > 0)
    {
        write(remote_sock, data, strlen(data)+1);
        memset(data, 0, sizeof(data));
    }
    status = read(remote_sock, data, sizeof(data)-1);
    if (strlen(data) > 0)
    {
        write(client_sock, data, strlen(data)+1);
        memset(data, 0, sizeof(data));
    }

    return status;
}
Here’s where using non-blocking sockets is important. With our current implementation, data can go back and forth from either side at any interval. If we were using traditional blocking sockets, we’d restrict our connection to requiring the opposite side to send something back before we could continue. This might work for an http connection or something similar, but would fail for something like a remote shell or chat client.
Let’s see this in action…
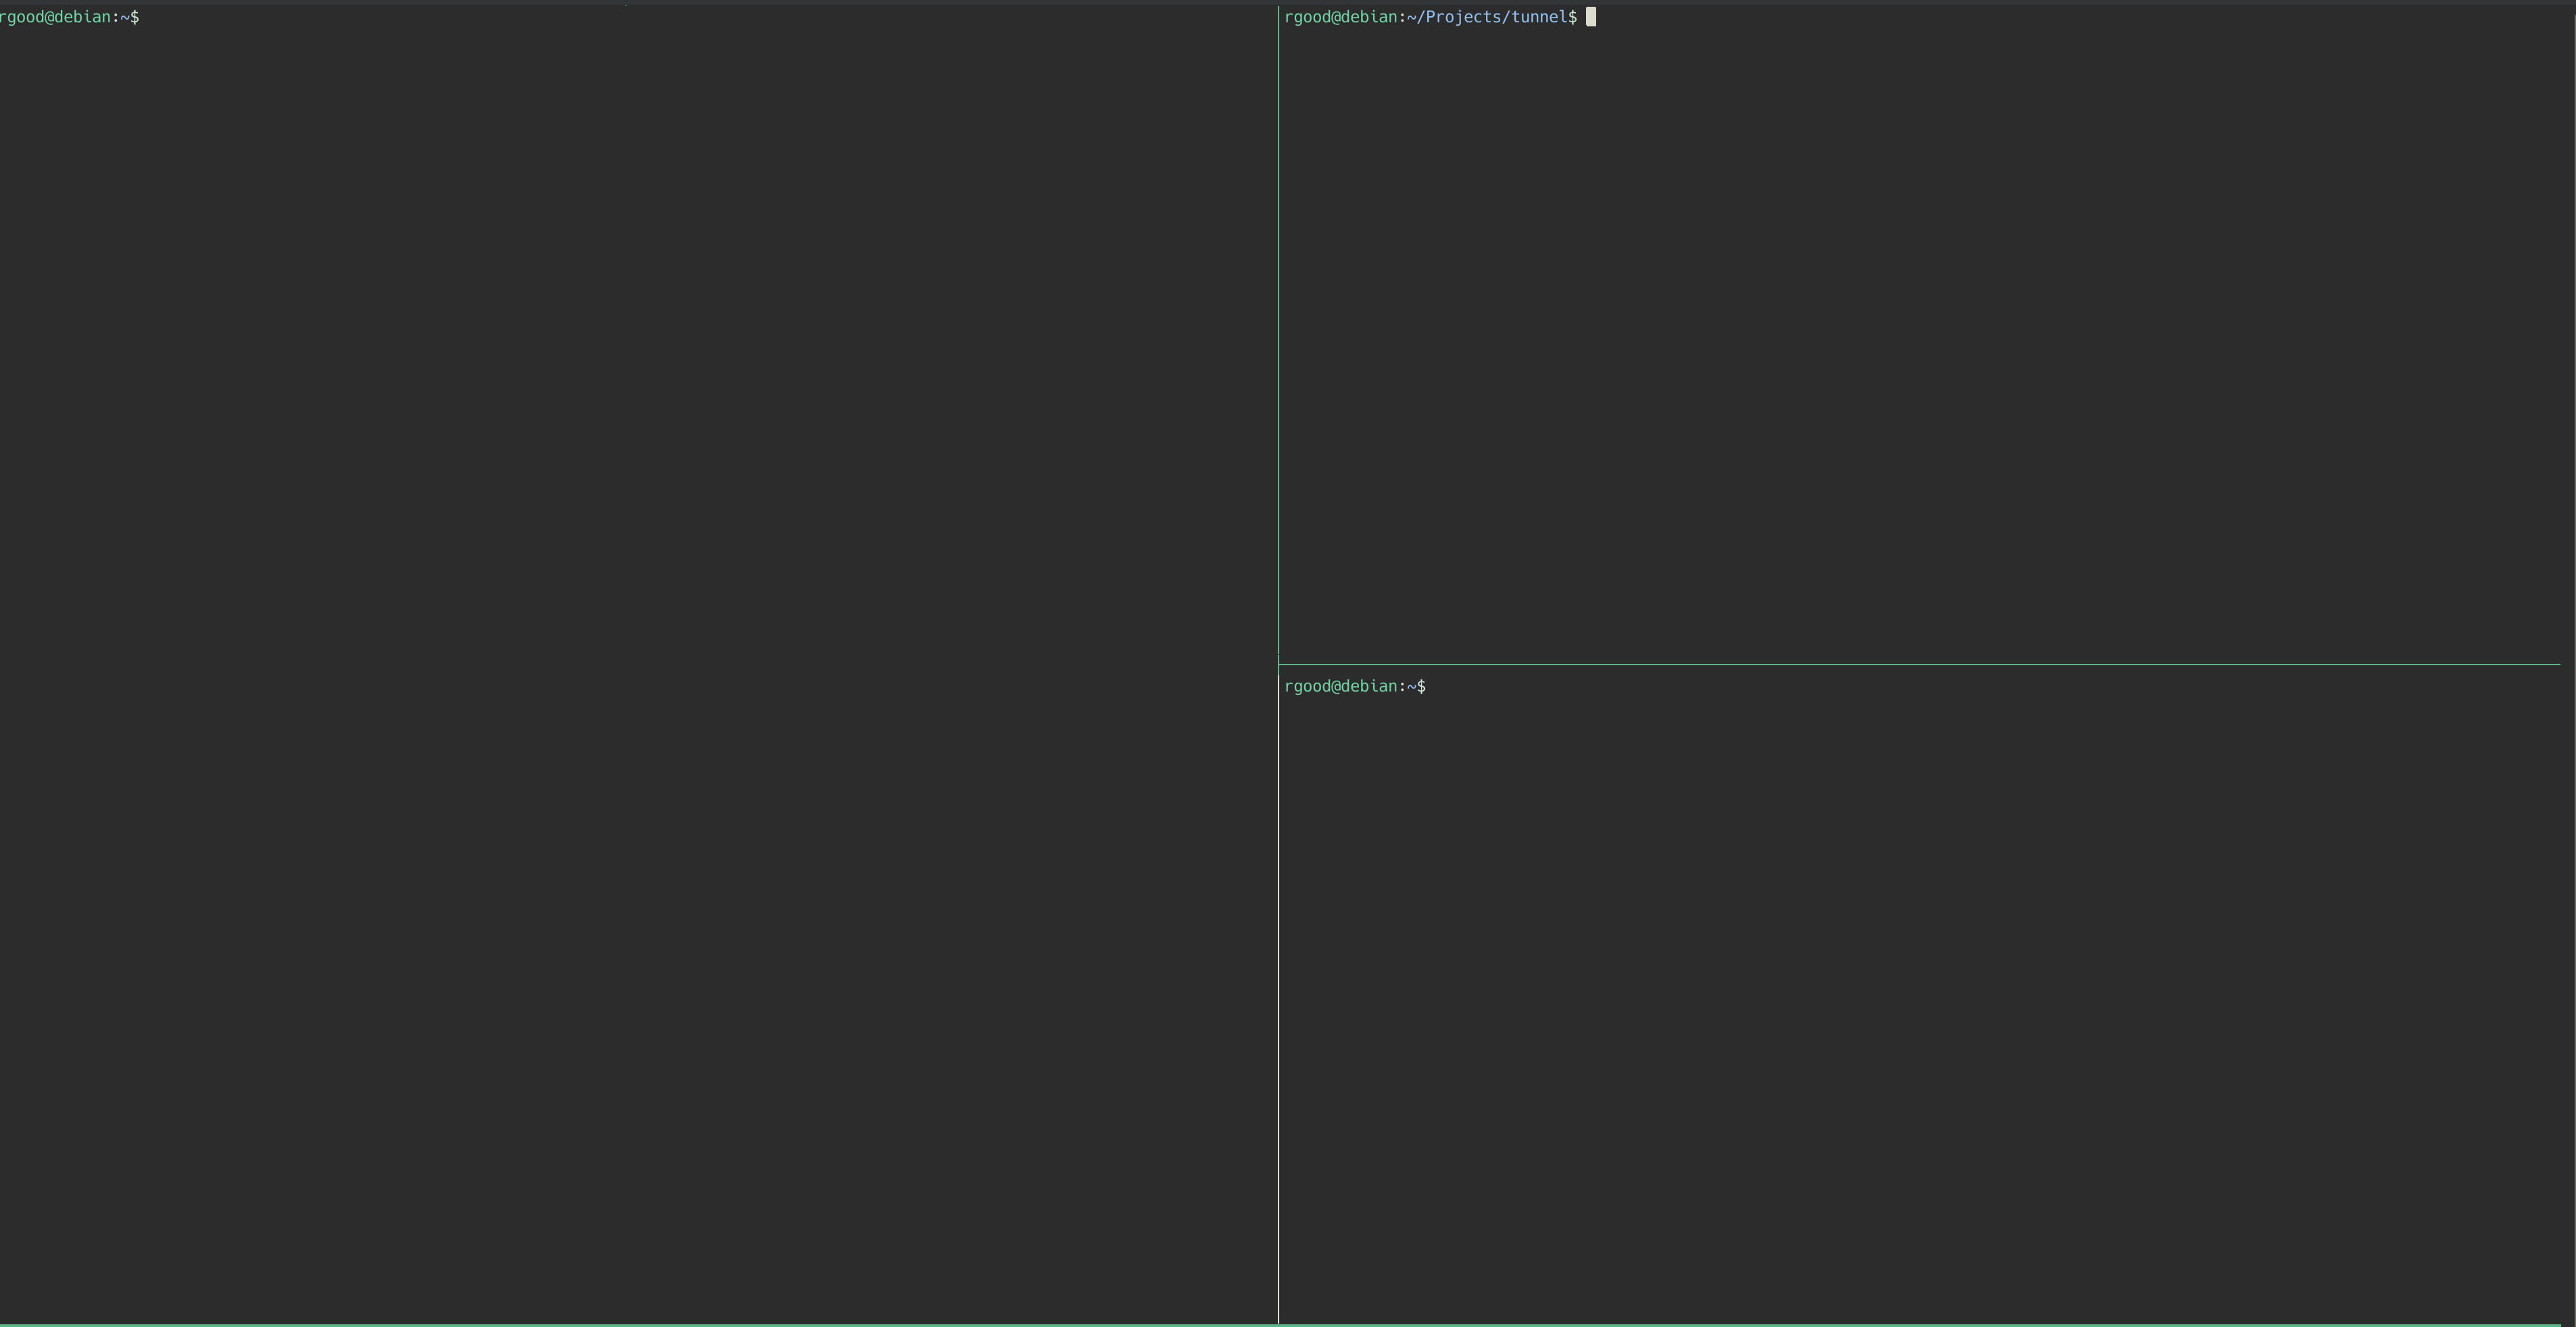
In the example shown, the final destination is a netcat listener waiting for connections on port 1338 (Bottom right of the screen). The proxy is initiated on the top right of the screen, and listens on port 1337. The client (left side) then connects to the proxy using a netcat client, and begins communicating with the destination server.
Tunnelling Summary
Before we get into the technical implementation of tunneling, let’s take a look at the environment we’ll be moving our packets through (docker-compose).
services:
  private-web:
    build: ./private-web/
    networks:
      private:
        ipv4_address: 172.21.0.3
    ports:
      - "80"
    command: python -m http.server 80
    volumes:
      - ./private-web/contents/:/var/www/html/
  private-host:
    build: ./private-host/
    networks:
      private:
        ipv4_address: 172.21.0.2
      public:
        ipv4_address: 172.21.1.2
    command: nc -lp 31337
    volumes:
      - ./private-host/contents/:/home/user/
  public-host:
    build: ./public-host/
    networks:
      public:
        ipv4_address: 172.21.1.3
    ports:
      - "1336"
      - "1337"
    command: nc -lp 31337
    volumes:
      - ./public-host/contents/:/home/user/

networks:
  private:
    ipam:
      config:
        - subnet: 172.21.0.0/24
          gateway: 172.21.0.1
  public:
    ipam:
      config:
        - subnet: 172.21.1.0/24
          gateway: 172.21.1.1
In this environment we have 3 hosts. One hosting a private website (private-web), a basic host that’s on the same network as the private website (private-host), and another basic host that is on a network we’ve labeled “public” (public-host). If you take a closer look at the “private-host”, you’ll see it is on both the private and public network. This will be our bridge. Ignore the nc -lp 31337 command, i’m just using this to make sure the containers don’t shut down prematurely. We won’t actually be using netcat for anything in this example.
What we’ll be looking to accomplish in this example is to make a tool that will run on the private host. We’ll also be making a quick python script to act as a client, and run on the public host. The service running on the private host will establish connections to both the public host and the private web server. It will then allow traffic to pass through it between the public host and the private web server, allowing the public host to access a service it normally would not be able to reach.
Once the connections are established, the python script will listen for new connections, and forward them through the existing tunnel that it has created with the remote service on the private host.

It’s important that we’re having the private host connect back to the public host. We’ve configured the private host so that it won’t allow listening on any ports, to simulate a strict network. However, the private host is still allowed to make outbound connections. Because of this we can still establish a connection between the public and private host, and leverage that to tunnel deeper into the network of ineterest. If you’re familiar with ssh, this would be like using the -R flag.
The containers we’re using for these examples are pretty barebones alpine images.
FROM python:3.10.4-alpine3.14

WORKDIR /var/www/html

RUN pip install simple_http_server
FROM alpine:latest

WORKDIR /home/user
Remote Service
The code for the service running on the private host is very similar to our proxy code. The only real difference is that it’s going to be connecting to both servers of interest instead of doing any listening.
int main(int argc, char **argv)
{
    int status = 0;
    int client_sock = 0;  // Receives proxy requests
    int remote_sock = 0;  // Proxy target
    struct sockaddr_in conn_addr = {0};

    status = setup_client_conn(&client_sock);
    if (status < 0)
    {
        puts("main: Failed to setup local listener.");
        return 1;
    }

    status = setup_remote_sock(&remote_sock);
    if (status != 0)
    {
        puts("main: Failed to setup remote socket.");
        return 1;
    }

    while(1){
            status = data_checks(client_sock, remote_sock);
            if (status < 0 && errno != EAGAIN)
            {
                puts("main: Failed data checks.");
                return 1;
            }else if (status == 0){
                puts("connection closed");
                close(client_sock);
                close(remote_sock);
                client_sock = 0;
                remote_sock = 0;
            }
    }

    return 0;
}
Both the setup_client_conn and the setup_remote_sock functions connect out to their respective services. I probably should have consolidated them into one function but I’m lazy so I didn’t follow DRY this time. Not production code right?

Anyway, on to the code…
/**
 * @brief Sets up the client socket
 *
 * @param client_sock pointer to socket fd to setup
 * @return int error code
 */
int setup_client_conn(int *client_sock)
{
    int status = 0;
    struct sockaddr_in client_addr;

    *client_sock = socket(AF_INET, SOCK_STREAM, 0);
    if (*client_sock == -1)
    {
        perror("setup_client_sock: socket");
        return -1;
    }

    client_addr.sin_family = AF_INET;
    status = inet_pton(AF_INET, CLIENT_ADDR, &(client_addr.sin_addr));
    if (status != 1)
    {
        perror("setup_client_sock: inet_pton");
        return -1;
    }
    client_addr.sin_port = htons(CLIENT_PORT);

    status = connect(*client_sock, (struct sockaddr *)&client_addr, sizeof(client_addr));
    if (status == -1)
    {
        perror("setup_client_sock: connect");
        return status;
    }
    status = fcntl(*client_sock, F_SETFL, fcntl(*client_sock, F_GETFL, 0) | O_NONBLOCK);
    if (status == -1)
    {
        perror("setup_client_sock fnctl");
        return status;
    }

    return status;
}
We’re once again connecting to a remote server and making our socket non-blocking. And yeah setup_remote_sock is literally the same thing.
Local Listener
import socket

LOCAL_ADDR = '127.0.0.1'
LOCAL_PORT = 1336
REMOTE_ADDR = '172.21.1.2'
REMOTE_PORT = 1337

KB = 1024
DATA_SIZE = 1 * KB

def listen_for_server() -> socket.socket:
    """Listen for remote server connection."""
    remote_listener = socket.socket(socket.AF_INET, socket.SOCK_STREAM)
    remote_listener.setsockopt(socket.SOL_SOCKET, socket.SO_REUSEADDR, 1)
    try:
        remote_listener.bind((REMOTE_ADDR, REMOTE_PORT))
    except:
        print('Unable to bind listener')
        return None
    remote_listener.listen(5)
    local_conn, _ = remote_listener.accept()
    print('Received remote connection')
    return local_conn


def listen_local() -> socket.socket:
    """Listen for local data to tunnel."""
    local_listener = socket.socket(socket.AF_INET, socket.SOCK_STREAM)
    local_listener.setsockopt(socket.SOL_SOCKET, socket.SO_REUSEADDR, 1)
    try:
        local_listener.bind((LOCAL_ADDR, LOCAL_PORT))
    except:
        print('Unable to bind listener')
        return None
    local_listener.listen(5)
    local_conn, _ = local_listener.accept()
    print('Received local connection')
    return local_conn

def tunnel_loop(local_conn: socket.socket, remote_conn: socket.socket) -> None:
    """Main tunnel traffic exchange loop."""
    data = None
    while True:
        try:
            data = local_conn.recv(DATA_SIZE)
        except BlockingIOError:
            pass
        if data:
            remote_conn.send(data)
        data = None
        try:
            data = remote_conn.recv(DATA_SIZE)
        except BlockingIOError:
            pass
        if data:
            local_conn.send(data)
        data = None

def init():
    """Tunnel setup and initialization."""
    remote_conn = listen_for_server()
    if not remote_conn:
        return
    remote_conn.setblocking(0)

    local_conn = listen_local()
    if not local_conn:
        return
    local_conn.setblocking(0)
    tunnel_loop(local_conn, remote_conn)


if __name__ == "__main__":
    init()
Our python listener functions very similarly to the original proxy. The syntax is just a lot more readable. Some basic swaps that happen are that we use setsockopt instead of fcntl, and checking for the BlockingIOError exception instead of the EAGAIN error. Making the sockets non-blocking is as easy as calling setblocking(0).
Tunnel Demonstration
In this demonstration, both windows on the left hand side will be running within the “public-host” container. The top left will be the client (wget) and the bottom left will run the local forwarding service (python script). On the right hand side we will have the “private-host” container running the remote service that will be used to provide the bridge to the private web server “private-web”.
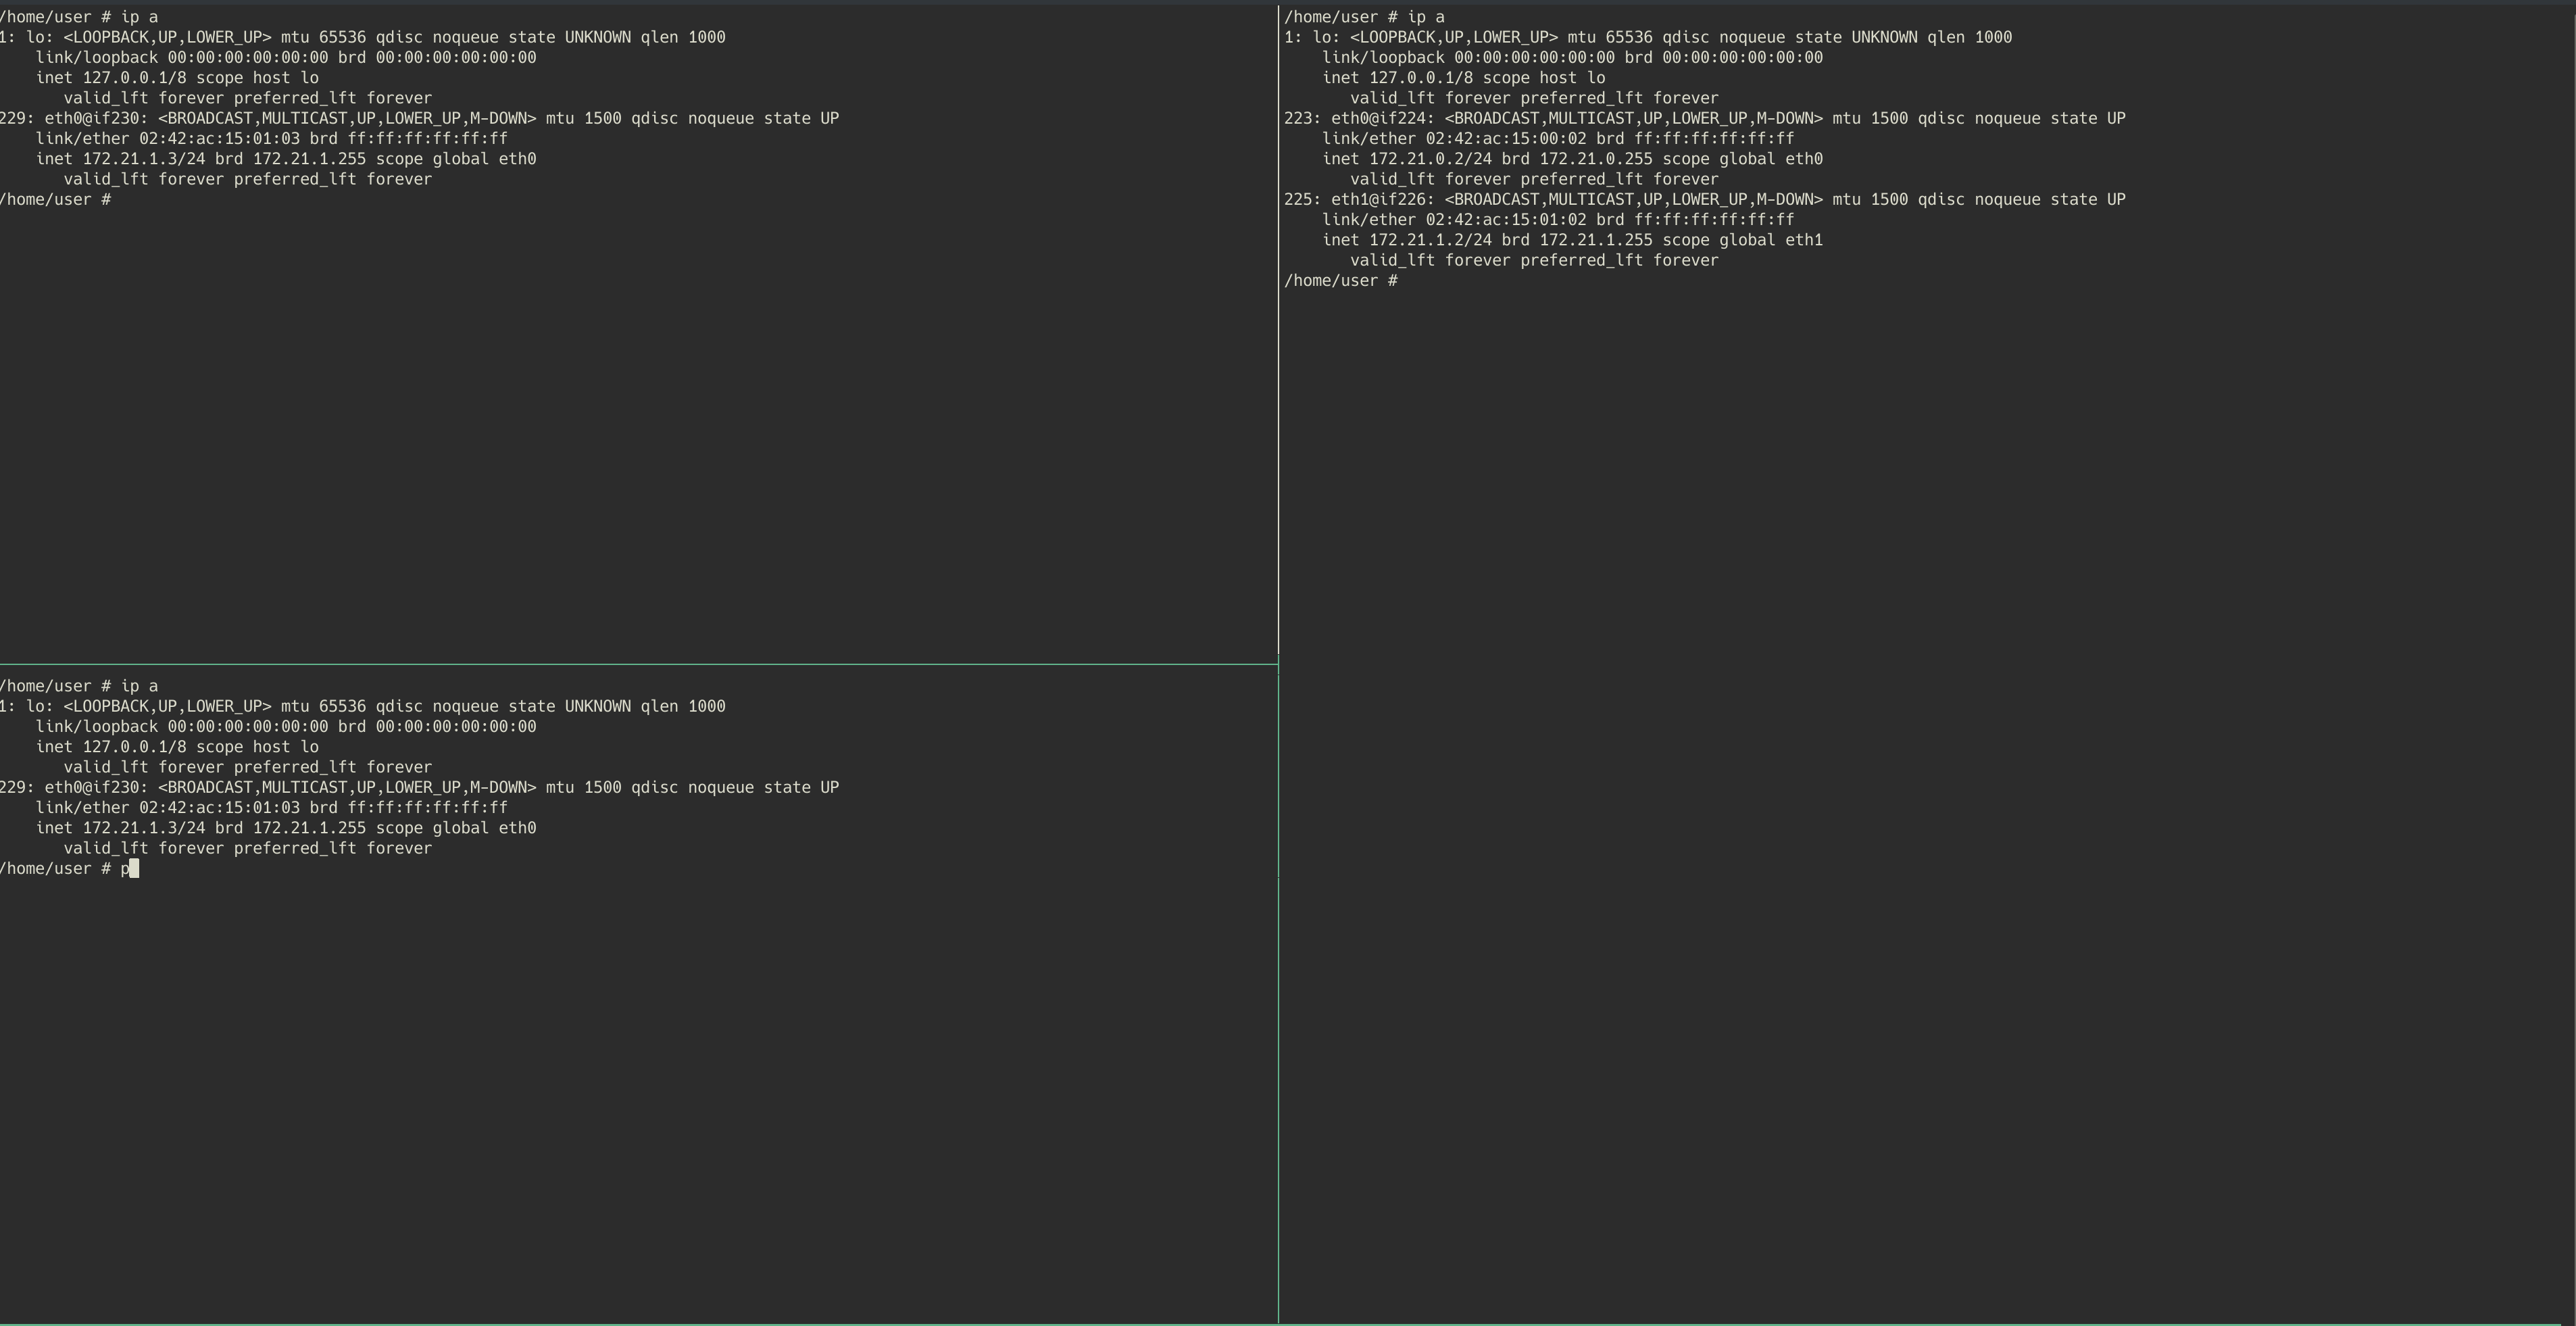
As we discussed, you will see the python client listener being launched on the bottom left (public-host), and then the remote service connects back to it from private-host. We are then able to run wget on the public-host, targetted at localhost port 1336. This request is routed through the local listening python service, to the remote service on private-host, and finally to the private web server that the private host is able to reach. The private web server can then send the requested page back through the tunnel.
If you’d like to recreate this demo, you can run docker-compose from the devops directory, and then exec into the containers as desired.
docker-compose build
docker-compose up -d
docker ps  # Look at container IDs
docker exec -it [container ID] sh
In it’s current state, this tool set is a very simplified tunnel. To really be useful, we’d want to wrap the traffic being passed through the tunnel in something like https. This would help us blend in with existing network traffic.
Anyway, that’s it for now! In future perhaps we’ll discuss things like tunneling through other protocols, encrypting traffic, handling multiple clients/destinations simultaneously, etc. Feel free to reach out with any feedback or questions. Thanks for making it to the end!